Basic Skinning Tutorial
By: NoisyMonk
This tutorial is a rewritten version of Henford's Skinning tutorial found at Deezire.
Before we ge started, you will need the RenX game pack for Gmax,and ChilliSkinner.
You can find RenX here
You can find ChilliSkinner here
You also need the DDS file plug-in found here
You will need to put that file in your Photoshop or Paintshop PlugIn's folder.
Let's Get Started
The picture below should provide all the information you need about ChilliSkinner.
Quoted items are somewhere in this picture.
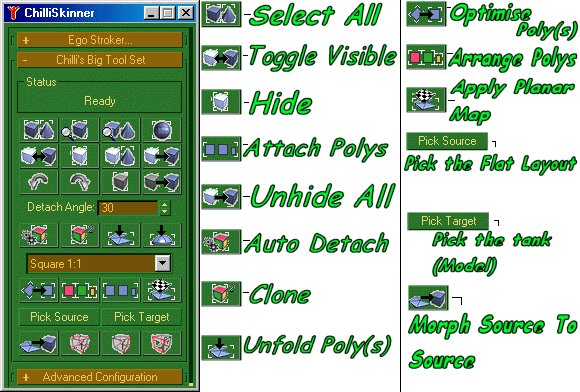
To start, you need to open up ChilliSkinner, you do this by clicking the..
Utilities Tab (Hammer) Then MAXScript Then Run Script then CSc3-0-2.ms
You will need to make sure that you have named all the objects on your model that you wish to appear as the colour of the side you are playing as HOUSECOLORx (x being a 2 digit number, ex. HOUSECOLOR01). You'll also need to make sure you name all the bones on your model. NOTE: The house colors and bones do not have to be named at this stage, it just makes it much easier to find them.
Now select all of the HouseColors and Bones that you want to hide, and click the "HIDE" button (see pic above). It is necessary to hide the bones and housecolors so that they do not appear in the UVMap.
Once you have all the objects you don't want skinned hidden, you need to select the whole model and click (in the ChilliSkinner menu) "ATTACH POLYS" Then click "DETACH POLYS" (this may take a few seconds). Your now should be separated into all of the different faces.
Now click the "CLONE" button.
Then click the "UNFOLD POLYS" button, this process may take some time.
When they flatten, press "OPTIMISE POLYS", then "ARRANGE POLYS", and then "ATTACH POLYS".
Now click "APPLY PLANAR MAP"
You should be left with something similar to this:
Now comes the bit where the skinning begins:
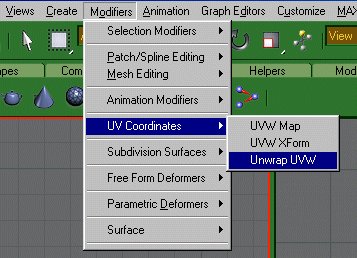
Make sure you have the flat layout selected, and then click the Modifiers Tab, then click UV Coordinates, then click Unwrap UVW.
Then click Edit.
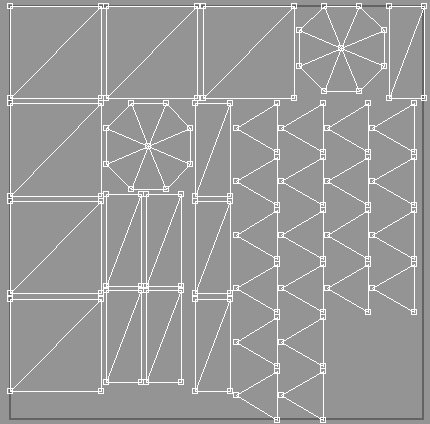
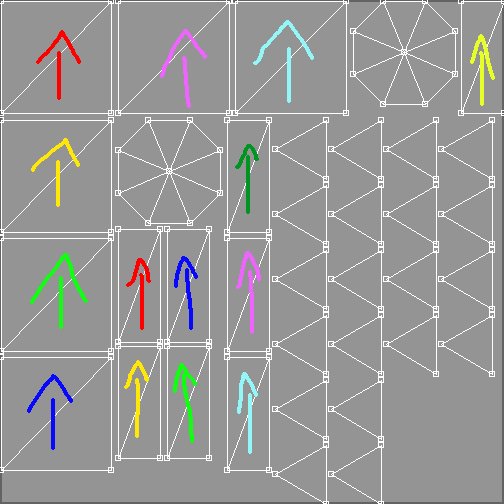
Then you will get a grey box similar to this:
Since this model was pretty basic, it is fairly easy to pick out which pieces come from where on the model. If you are using a more complex model, you have quite a bit of work ahead of you.
The Going Gets Tough
All of the different shapes represent a part of the model. You can move, rotate, and do whatever you please with these, but there are some KEY POINTS that you must remember....
If you place 2 objects over each other they WILL use the same UV Coordinates, as well as the SAME skin. For example,if all 6 of the boxes were placed over one another (each one represents an individual side of the box in the model) they would all have the same skin! You can use this method to your advantage to save time on objects that you want to have the same skin.
NOTE! NOT ALL OBJECTS ARE POINTED IN THE DIRECTION YOU WANT! YOU WILL NEED TO TEST MANY TIMES TO GET IT RIGHT!
Example:
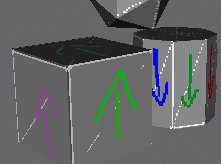
Note: Don't worry about applying the skin yet, that comes later.
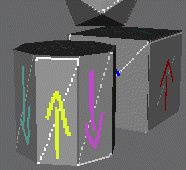
The arrows on the box seem to be fine, but look at the cylinder... all of them are upside down except for 1.
Note: There is no known way to tell just from looking if things line up correctly, you just have to try it
Also, another problem is trying to find out which polys are where on the model. For very complex models, it can take several hours to find out which polys go where, and what direction they should be facing. Only by testing quite a lot can you figure it out.
Alright, assuming that you aren't trying to skin a very complex model with tons of polys, we will continue on.
Once you are happy with your layout, take a screen capture of the grey box with your layout, with either Photoshop or Paint Shop Pro. You will need to crop out all the extra stuff, making sure that you are only left with the grey box. Cut it out so that they DARK BLACK outline is the edge of your picture. Now, resize the image. It is recommended that you use sizes such as 256x256, 512x512, or 1024x1044. If it isn't one of these sizes, it probably won't work.
Now save the layout as a .TGA file. Paint over the layout as this is what will appear on the tank in-game. When you are finished, save the layout. This is what the skin of the model looked like:
Note: This is the skin used to show you the problems earlier.
Now you will have to save the file as a DDS, as this is what Generals uses to read the skin. When you choose to save a DDS file, you will get a popup with a whole bunch of different options. Set them so that they look like this:
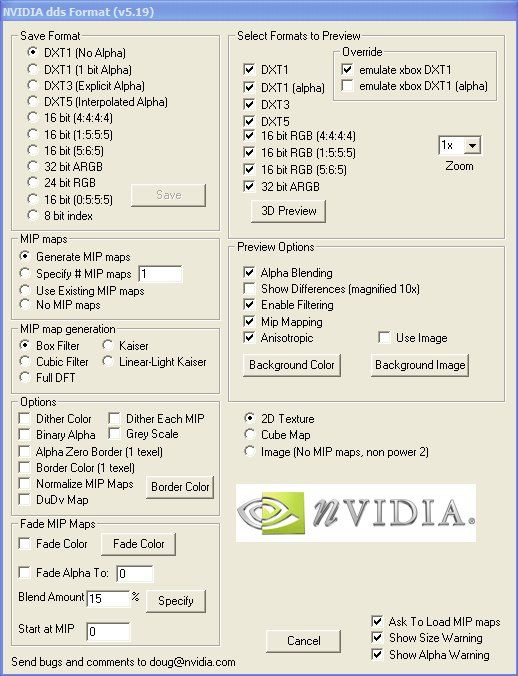
Special Thanks to Deezire for the image
Make sure that both the TGA and the DDS file are saved in your Art/Textures folder in your Generals directory before proceeding.
Mastermind Note: You should only need the DDS file, try it out and let me know
***NOTE! If at ANY time you see any of your bones or House colors come back, MAKE SURE YOU HIDE THEM AGAIN! THIS IS VERY IMPORTANT!
Now close your image editing program, and go back into RenX.
Click the "TOGGLE VISIBLE" button. The clone tank that you made earlier will appear. Click "SELECT ALL", then "ATTACH POLYS".
Now you will need to join the layout to the tank. To do this, click "UNHIDE ALL", then click "PICK SOURCE" and click the flat layout. Then click "PICK TARGET" and click the tank, then click "MORPH SOURCE TO TARGET"
The 2 objects will now be one object. Now click the GMax Material Editor Navigator
In the window that comes up, click File System, and lead it to your skin.
Select the image, and DRAG it onto your model.
Your skin is now applied! Well Done!